
Manuals Guides and Videos
RT87 Reference High Fidelity Dual-Plinth Turntable
|
|
Fluance Universal Turntable Headshell with SME/H-4 Bayonet Mount (HS86L) |
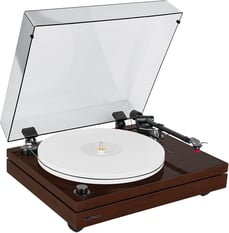
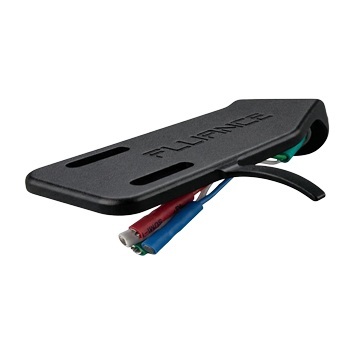
What's in the box?
The Fluance RT87 Reference Turntable includes the following components:
- RT87 Turntable
- Dust Cover and Hinges
- 4.1 Pound Acrylic Platter
- Headshell with cartridge/stylus (Ortofon 2M Blue or AT-VM95ML)
- Counterweight
- Power Adapter
- RCA Audio Cable
- Ground Wire
- Anti-Skate Weight
- Hex Wrench
- Transit Screw Hole Covers x2
- Bubble Level
- Round Rubber Belt
First Time Set Up
Step One: Removing the Shipping Protection
-
Place the turntable on a sturdy surface. Loosen and remove the three transit screws from the plinth. This will release the upper plinth from the lower plinth.
-
Install the included Transit Screw Covers on each empty hole. The removed screws should be stored in the provided envelope for future use. If replacement screws are needed, use M6 x 30mm (L) Pan Head.
-
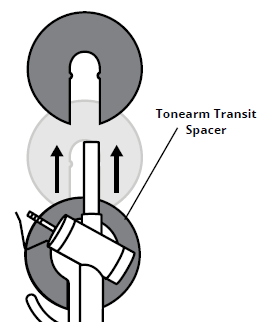
Remove the Tonearm Transit Spacer by gripping it firmly and pulling towards the back of the turntable.
Step Two: Installing the Counterweight
-
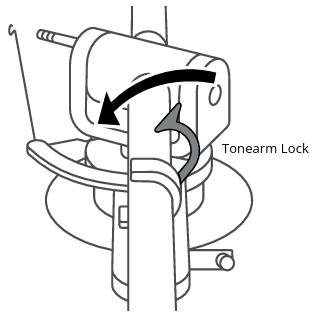
Secure the tonearm using the tonearm lock.
-
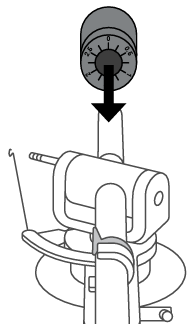
Slide the counterweight onto the end of the tonearm with numbers facing forward. It should click several times.
Step Three: Installing the Headshell
-
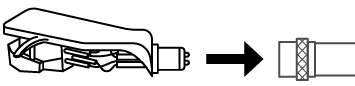
Remove the headshell from the protective packaging and insert into the end of the tonearm.
-
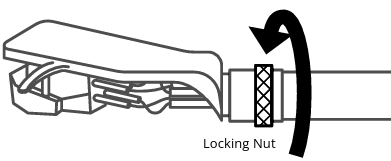
Tighten the locking nut until the headshell is secure.
Step 4. Tonearm Set Up (Balancing & Setting Tracking Force)
-
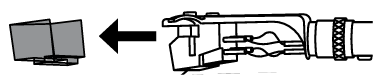
Remove the stylus protector.
-
Unlock the tonearm and lift the cueing lever.
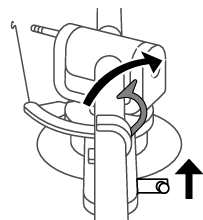
-
Position the tonearm over the plinth as shown below.
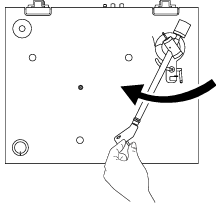
-
Hold the headshell and lower the cueing lever completely.
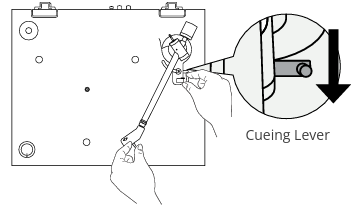
-
With the cueing lever now lowered, turn the entire counterweight until the tonearm is balanced and floating horizontally when headshell is released.

-
Set only the couterweight indicator ring to “0” on the center line while keeping the tonearm balanced, then lock the tonearm on the tonearm rest.
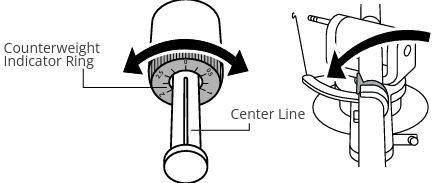
-
Rotate the entire counterweight counterclockwise until the indicator ring is set to 2.0 g on the center line.
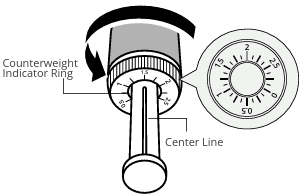
Step Five: Installing the Anti-Skate Weight
-
Install the anti-skate weight by placing the loop around the anti-skate mounting post and then hang the string over the anti-skate hanger.
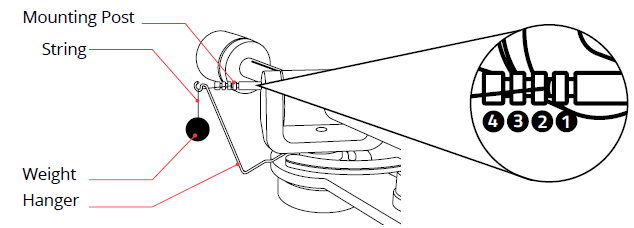
-
The mounting post has 4 notches that allow the user to set the correct anti-skating force. For the correct setting for you cartridge, see the table below.
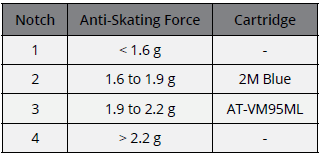
NOTE: These values are dependent on using the included counterweight and headshell.
Step Six: Installing the Platter
-
Place the platter on the spindle located in the middle of the turntable.
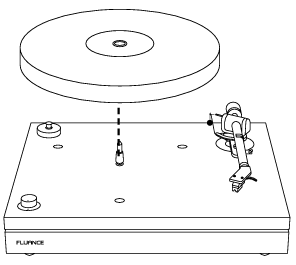
-
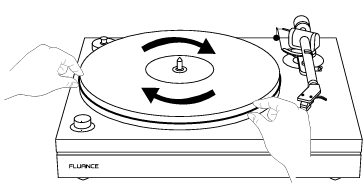
Place the rubber belt onto the outside edge of the platter and rotate the platter until the belt is fully installed around the platter. Be careful not to overstretch the belt when installing.
-
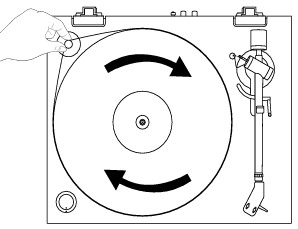
Lift the rubber belt and place it around the motor pulley. Rotate the platter several times to ensure the rubber belt is secure and not twisted.
Step Seven: Installing the Dust Cover
-
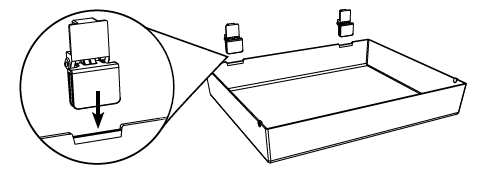
Place dust cover on a soft surface to avoid scratching it. Install the hinges on the provided grooves located on the back of the dust cover.
-
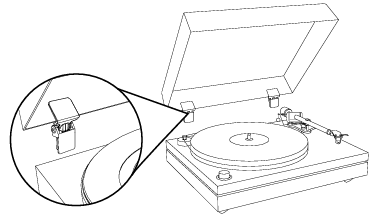
Carefully open the hinges on the dust cover and insert into the pre-installed hinge mounts on the back of the turntable.
Step Eight: Leveling the Turntable
-
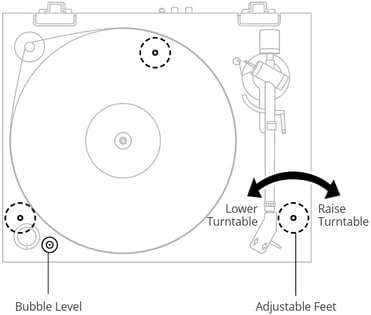
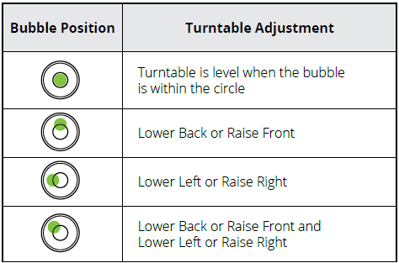
This turntable features 3 adjustable feet to ensure the turntable is level regardless of the surface the turntable is resting upon.
-
Place the bubble level on the plinth and adjust the feet until the bubble is entirely within the circle.
Step Nine: Connecting the RCA and Ground Cables
-
This turntable does not have an internal preamp, so an external preamp or an amplifier with a PHONO input must be used.
-
Connect the RCA and ground cable to the back of the turntable and then connect the other ends to your external preamp or the PHONO input and ground terminal on your amplifier. Ensure the cable colors are matched to the RCA connector colors.
NOTE: The included RCA cable is a high quality cable with a <90pF capacitance rating. For best performance it is recommended that any other RCA connections use a similarly rated cable. The Fluance RCA cable is available at www.fluance.com/turntable-accessories
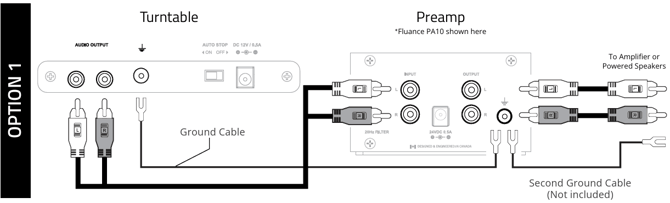
IMPORTANT: When using an external preamp one ground wire should be connected between the turntable and the preamp. A second ground wire (not included) should be connected between the preamp and the amplifier/powered speakers if humming still occurs.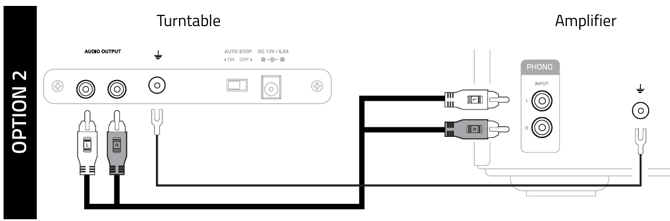
IMPORTANT: The ground wire must be connected to both turntable and amplifier. Failure to connect to both can result in unwanted noise/humming.
Step Ten: Connecting the Power Adapter
-
Insert the power cable into the power input on the back of the turntable.

-
Ensure the power adapter is securely connected to a power outlet.
NOTE: It is recommended to reconfirm with the bubble level that the turntable is still level after setup is complete.
IMPORTANT: Only use the official power adapter included with your turntable.
Step Eleven: Playing a Record
-
Lift the dust cover.
-
Place a record on the spindle (use a 45 adapter (not included) if necessary).
-
Turn the speed selection knob to the correct RPM typically listed on your record (Normal LP playback speed is 33 RPM) NOTE: For 78 RPM, see section below.
-
Unlock the tonearm lock.
-
Lift the cueing lever.
-
Move the tonearm to the desired starting point and the platter will start to spin (if auto-stop is on).
-
Lower the cueing lever.
78 RPM Playback
Most records that play at 78 RPM are made from shellac instead of vinyl. Shellac is a harder material and can cause excessive wear and tear on standard stylus tips. To avoid this, it is recommended to always use a cartridge/stylus that is designed for 78 RPM playback such as the Ortofon 2M 78. To support 78 RPM cartridge weights of 5-7.2g with tracking force ranges of 2-5g, use our CW86 counterweight, to achieve the correct tracking force.
Advanced Set Up
Adjusting Tonearm Height (VTA)
This turntable features a tonearm with adjustable height to ensure compatibility with cartridges of different sizes. The tonearm should be rebalanced before setting the tracking force for the new cartridge. For information on cartridge compatibility, see the table below.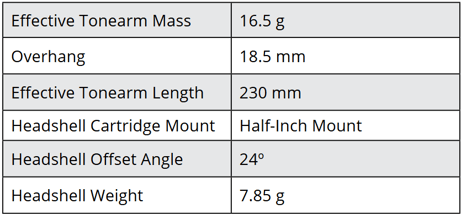
CAUTION: Do not make VTA adjustments with the stylus on the record. Make VTA adjustments only with the tonearm locked.
-
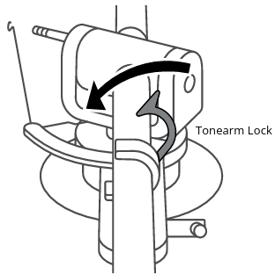
Once the new cartridge installation is complete, lock the tonearm with the tonearm lock and place a record onto the platter.
-
Unlock the tonearm, remove the stylus guard, and use the cueing lever to lift and lower the stylus onto the record.
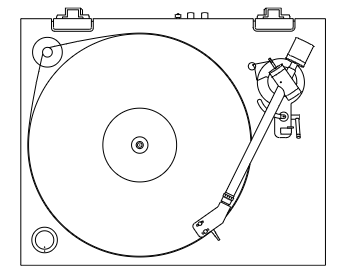
WARNING: Use caution to avoid accidental damage. -
The Tonearm should be parallel with the record surface when height is set correctly. Use the horizontal line on the tonearm to check if it's level. Take note of how much adjustment is needed and return the tonarm to the rest. Lock it in place.
.png?width=670&height=129&name=Level_Tonearm%20(1).png)
-
Use the provided hex wrench to loosen the tonearm height adjustment screw on the base of the tonearm.
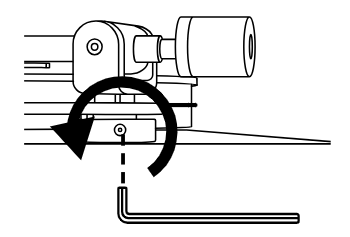
IMPORTANT: The turntable is shipped with a spacer installed. The spacer should be removed. -
Raise or lower the tonearm and, while holding the tonearm base in position, use the hex wrench to gently tighten the adjustment screw. Avoid overtightening the screw.
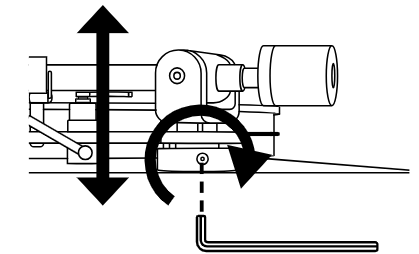
-
Unlock the tonearm and place the stylus on the record. Confirm that the tonearm is now parallel with the record surface. If further adjustment is needed repeat steps 3-5 and then check again.
Troubleshooting
Turntable Not Spinning
- Turn the speed selection knob to 33, 45, or 78 (power LED should light up).
- Lift the tonearm over the platter and it should start spinning if auto-stop is enabled. If auto-stop is disabled, the platter should spin when the speed is selected.
- The turntable should be connected to a known good power outlet and the power cable should be securely inserted into the unit.
- Only use the official power adapter (12 V 0.5 A) included with your turntable.
- Ensure the rubber belt is intact and installed around the platter and the motor pulley.
No Power
- The turntable should be connected to a known good power outlet and the power cable should be securely inserted into the unit.
- Only use the official power adapter (12 V 0.5 A) included with your turntable.
- The power LED should light up when the speed selection knob is set to 33, 45, or 78.
Wrong Speed
- Check the record label for the correct playback speed and that the speed selection knob is set to match it.
- Normal LP playback speed is 33 1/3 RPM, but some play at 45 RPM or 78 RPM.
Skipping
- Ensure the record surface is clear of dirt and debris. Also check that the record is not warped or deformed.
- Inspect the stylus tip for built up dirt or debris. Use a stylus cleaning brush to clean if necessary.
- Ensure the turntable is on a sturdy and level surface and properly leveled using the adjustable feet.
- Use the instructions in Step Four of the first time setup instructions to confirm the tonearm was balanced correctly and set to the correct tracking force for the included cartridge.
- Check that the anti-skate force is set to match the required tracking force for the cartridge.
- Confirm that the tonearm bridge is not in contact with the tonearm when the cueing lever is lowered. See Cueing Lever Not Lowering Tonearm troubleshooting for more details.
Audio Feedback/Humming/Rumbling that increases with volume
- If audio feedback occurs ensure the speakers are positioned away from the turntable.
- The turntable should not be placed in an enclosed space, in front of the speakers, or on the same surface as the speakers.
- For best audio performance the dust cover should be removed during playback.
- Playback at excessive volume can cause feedback. If feedback is occurring decrease volume or lower bass levels.
- If using an external preamp with a rumble filter, turn it on to reduce resonance feedback.
- An isolation base (Fluance IB40) can be also added to reduce unwanted vibrations.
Cueing Lever Not Lowering Tonearm
- Use instructions in Step Four of the first time setup instructions to confirm the tonearm was balanced and set to the correct tracking force.
- Lock the tonearm and lower the cueing lever.
- Gently press down on the tonearm bridge until fully lowered to reset the tonearm lowering mechanism and then test again.
Low Volume
- Speakers are required for vinyl record playback.
- Check the RCA connections are correct and fully inserted.
- If the turntable is directly connected to an amplifier it must have a PHONO input.
- The turntable does not include an internal preamp so an external preamp or amplifier with PHONO input must be used with the turntable. The Fluance High Fidelity Phono Preamp (PA10) is designed for the Reference Series turntables and is available on www.fluance.com.
- If using a Moving Coil cartridge ensure your phono preamp supports moving coil cartridges and is set correctly.
Humming Sound / Buzzing Sound
- Connect the ground wire to your external preamp or amplifier. If using an external preamp, try using a second ground wire from the preamp to the amplifier/powered speakers.
- Ensure the headshell is fully tightened and secured on the tonearm.
- The turntable and other devices should be directly connected to a power outlet. It is recommended to avoid power bars or extension cables.
- Ensure the speakers are positioned away from the turntable. The turntable should not be placed in front of the speakers or on the same surface as the speakers.
- Do not place near sources of interference such as routers, receivers, or other electronic devices.
- Remove the dust cover and then test again.
Audio From Only One Channel
- Test the speakers with another device such as a CD Player or Smartphone. Confirm the tonearm is balanced and using the correct tracking force.
- Disconnect and reconnect the RCA cables ensuring they are fully inserted.
- Disconnect the RCA cables from the turntable and touch the connectors with your thumbs, if both channels work, the issue is a turntable component. If not Disconnect the RCA cables from the preamp and repeat the steps, if there if both channels work there, the preamp or the other set of RCA cables may be the cause.
- Try a different set of RCA cables.
- Remove the headshell from the tonearm and use rubbing alcohol on a cotton swab to clean the contacts on the back of the headshell.
- Reinstall the headshell ensuring the locking nut is tightened completely.